CSS - 高阶技巧

一、精灵图

1. 精灵图(sprites)的使用

使用核心:

  1. 精灵图主要针对背景图片使用,可以把多个背景图放到一张大图中,减少服务器的请求次数
  2. 移动背景图片位置(background-position
  3. 移动距离就是图片的 x 和 y 轴坐标(与网页坐标不同),一般都是往左往上移动,所以数值都是 负值

语法:

1
2
3
4
5
background-position: x y;


background: url(图片路径) x y;

::: details

1
2
3
4
5
6
7
8
9
10
11
12
13
14
15
16
17
18
19
20
21
22
23
24
25
26
27
28
29
30
31
32
33
34
<!DOCTYPE html>
<html lang="en">

<head>
<meta charset="UTF-8">
<meta http-equiv="X-UA-Compatible" content="IE=edge">
<meta name="viewport" content="width=device-width, initial-scale=1.0">
<title>Document</title>
<style>
* {
margin: 0;
padding: 0;
}
.demo1 {
width: 56px;
height: 56px;
margin: 20px auto;
background: url(https://img.pupper.cn/img/202111241451142.png) no-repeat -184px 0;
}
.demo2 {
width: 23px;
height: 23px;
margin: 20px auto;
background: url(https://img.pupper.cn/img/202111241451142.png) no-repeat -157px -107px;
}

</style>
</head>

<body>
<div class="demo1"></div>
<div class="demo2"></div>
</body>
</html>

:::

二、 字体图标

字体图标(iconfont): 主要用于显示网页中通用、常用的一些小图标

1. 下载字体图标

  1. icomoon 字库 http://icomoon.io
    1. 国外字体库,非常全面,但是访问较慢
  2. 阿里 iconfont 字库 http://www.iconfont.cn
    1. 国内字体库,访问快,免费

2. 引入字体图标

  1. 将下载包里的 fonts 文件夹放入页面根目录
  2. 在css样式中全局声明字体
    1
    2
    3
    4
    5
    6
    7
    8
    9
    10
    11
    12
      <!-- 字体声明 -->
    @font-face {
    font-family: 'icomoon';
    src: url('fonts/icomoon.eot?p4ssmb');
    src: url('fonts/icomoon.eot?p4ssmb#iefix') format('embedded-opentype'),
    url('fonts/icomoon.ttf?p4ssmb') format('truetype'),
    url('fonts/icomoon.woff?p4ssmb') format('woff'),
    url('fonts/icomoon.svg?p4ssmb#icomoon') format('svg');
    font-weight: normal;
    font-style: normal;
    font-display: block;
    }


1
2
<span></span>
<span></span>

</code-block>

1
2
3
4
5
6
7
8
9
10
11
12
13
14
15
16
17
18
19
20
<style>
/* 字体声明 */
@font-face {
font-family: 'icomoon';
src: url('fonts/icomoon.eot?p4ssmb');
src: url('fonts/icomoon.eot?p4ssmb#iefix') format('embedded-opentype'),
url('fonts/icomoon.ttf?p4ssmb') format('truetype'),
url('fonts/icomoon.woff?p4ssmb') format('woff'),
url('fonts/icomoon.svg?p4ssmb#icomoon') format('svg');
font-weight: normal;
font-style: normal;
font-display: block;
}

span {
font-family: 'icomoon';
font-size: 100px;
color:pink;
}
</style>

</code-block>
</code-group>

3. 添加新的字体图标

重新上传 selection.json 文件,选择要新加的字体图标,然后下载覆盖之前的文件

三、CSS三角的做法

  1. 定义一个宽和高为0,边透明的正方形,
  2. 需要哪个方向的三角,就改变哪个方向的颜色

::: details

1
2
3
4
5
6
7
8
9
10
11
12
13
14
15
16
17
18
19
20
21
22
23
24
25
26
27
28
29
30
31
32
33
34
35
36
37
38
39
40
41
42
43
44
45
46
47
48
49
50
51
52
53
54
55
56
57
58
59
<!DOCTYPE html>
<html lang="en">

<head>
<meta charset="UTF-8">
<meta http-equiv="X-UA-Compatible" content="IE=edge">
<meta name="viewport" content="width=device-width, initial-scale=1.0">
<title>Document</title>
<style>
.box {
display: inline-block;
width: 0;
height: 0;
border: 50px solid transparent;
}
.demo1 {
border-top-color: red;
}
.demo2 {
border-left-color: blue;
}
.demo3 {
border-right-color: green;
}
.demo4 {
border-bottom-color: gold;
}

.jd {
margin-top: 50px;
position: relative;
width: 100px;
height: 100px;
background-color: aquamarine;
}
.jd span{
position: absolute;
right: -40px;
top: 60px;
width: 0;
height: 0;
border: 20px solid transparent;
border-left-color: aquamarine;

}
</style>
</head>

<body>
<div class="box demo1"></div>
<div class="box demo2"></div>
<div class="box demo3"></div>
<div class="box demo4"></div>
<div class="jd">
<span></span>
</div>
</body>
</html>

:::

四、CSS用户界面样式

1. 更改鼠标样式(cursor)

语法:

1
2
3
选择器 {
cursor: default | pointer | move | text | not-allowed
}
属性值说明
default小白(默认)
pointer小手
move移动
text文本
not-allowed禁止

::: details

1
2
3
4
5
6
7
8
9
10
11
12
13
14
15
16
17
18
19
20
21
<!DOCTYPE html>
<html lang="en">

<head>
<meta charset="UTF-8">
<meta http-equiv="X-UA-Compatible" content="IE=edge">
<meta name="viewport" content="width=device-width, initial-scale=1.0">
<title>Document</title>
</head>

<body>
<ul>
<li style="cursor: default">小白不改变</li>
<li style="cursor: pointer;">小手</li>
<li style="cursor: move;">移动</li>
<li style="cursor: text;">文本</li>
<li style="cursor: not-allowed;">禁止</li>
</ul>
</body>
</html>

:::

2. 去除输入框轮廓线 (outline)

给表单添加 outline: 0;outline: none; 样式后,可以去除边框线

1
2
3
4
5
6
7
8
9
10
11
12
13
14
15
16
17
18
19
<!DOCTYPE html>
<html lang="en">

<head>
<meta charset="UTF-8">
<meta http-equiv="X-UA-Compatible" content="IE=edge">
<meta name="viewport" content="width=device-width, initial-scale=1.0">
<title>Document</title>
<style>
input {
outline: none;
}
</style>
</head>

<body>
<input type="text">
</body>
</html>

3. 防止拖拽文本域 (resize)

给文本域添加 resize: none;,就可以防止文本域被拖拽

::: details

1
2
3
4
5
6
7
8
9
10
11
12
13
14
15
16
17
18
19
20
21
<!DOCTYPE html>
<html lang="en">

<head>
<meta charset="UTF-8">
<meta http-equiv="X-UA-Compatible" content="IE=edge">
<meta name="viewport" content="width=device-width, initial-scale=1.0">
<title>Document</title>
<style>
textarea {
resize: none;
outline: none;
}
</style>
</head>

<body>
<textarea name="" id="" cols="30" rows="10">去除轮廓和拖拽</textarea>
</body>
</html>

:::

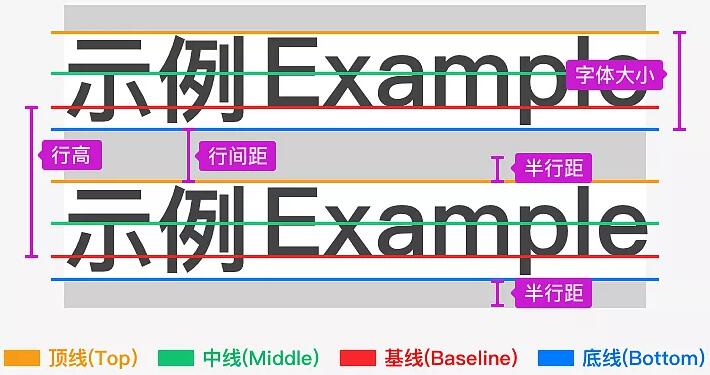
五、行内块元素与文字对齐 (vertical-align)

vertical-align:用于设置图片或表单等 行内块 元素 和 文字垂直对齐

语法:

1
2
3
/* 基线对齐、顶端对齐、中部对齐、低端对齐 */

vertical-align: baseline | top | middle | bottom

说明
baseline默认,元素放在父元素的基准线上
top把元素的顶端与行中最高元素的顶端对齐
middle把元素放在父元素的中部
bottom把元素的顶端与行中最低的元素的顶端对齐

用途:

  1. 可以使图片与文字居中垂直居中对齐
  2. 可以去除图片(行内块元素)下方空白

::: details

1
2
3
4
5
6
7
8
9
10
11
12
13
14
15
16
17
18
19
20
21
22
<!DOCTYPE html>
<html lang="en">

<head>
<meta charset="UTF-8">
<meta http-equiv="X-UA-Compatible" content="IE=edge">
<meta name="viewport" content="width=device-width, initial-scale=1.0">
<title>Document</title>
<style>
.demo img {
vertical-align: middle;
}
</style>
</head>

<body>
<div class="demo">
<img src="https://img.pupper.cn/img/202111231118957.png" alt="">
使用 vertical-align: middle ,就可以使文字和图片对齐
</div>
</body>
</html>

:::

六、 文字溢出省略号显示

1. 单行文本溢出省略号显示

::: note
三个必要条件:

  1. 强制一行内显示文本(white-space: nowrap; 默认 normal 自动换行)
  2. 超出部分隐藏 (overflow: hidden;
  3. 文字用省略号替代超出部分(text-overflow: ellipsis;
    :::
1
2
3
4
5
6
/* 固定写法 */
选择器 {
white-space: nowrap;
overflow: hidden;
text-overflow: ellipsis;
}

2. 多行文本溢出省略号显示

::: note

  1. 超出部分隐藏 (overflow: hidden;
  2. 文字用省略号替代超出部分(text-overflow: ellipsis;
  3. 将盒子模型转换为弹性盒子模型 (display: -webkit-box;
  4. 限制块元素显示的文本行数 (-webkit-line-clamp: 2;
  5. 盒子的子元素排放方式为居中 (-webkit-box-orient: vertical;
    :::
1
2
3
4
5
6
7
8
/* 固定写法 */
选择器 {
overflow: hidden;
text-overflow: ellipsis;
display: -webkit-box;
-webkit-line-clamp: 2;
-webkit-box-orient: vertical;
}

::: details

1
2
3
4
5
6
7
8
9
10
11
12
13
14
15
16
17
18
19
20
21
22
23
24
25
26
27
28
29
30
31
32
33
34
35
36
37
38
<!DOCTYPE html>
<html lang="en">

<head>
<meta charset="UTF-8">
<meta http-equiv="X-UA-Compatible" content="IE=edge">
<meta name="viewport" content="width=device-width, initial-scale=1.0">
<title>Document</title>
<style>
.demo{
width: 120px;
height: 40px;
border: 1px solid red;
}
.box1 {
white-space: nowrap;
overflow: hidden;
text-overflow: ellipsis;
}
.box2 {
overflow: hidden;
text-overflow: ellipsis;
display: -webkit-box;
-webkit-line-clamp: 2;
-webkit-box-orient: vertical;
}
</style>
</head>

<body>
<div class="demo box1">
单行文本省略号显示
</div>
<div class="demo box2">
多行文本省略号显示多行文本省略号显示多行文本省略号显示多行文本省略号显示
</div>
</body>
</html>

:::

七、常见布局技巧

1. margin 负值运用

  1. 利用 margin-left:-1px; 去除边框重合
  2. 鼠标进过时,提高盒子的层次
    1. 如果没有定位,则使用相对定位 position: relative;
    2. 如果盒子定位了,则使用 z-index: 1;
1
2
3
4
5
6
7
8
9
10
11
12
13
14
15
16
17
18
19
20
21
22
23
24
25
26
27
28
29
30
31
32
33
34
35
36
37
38
39
40
<!DOCTYPE html>
<html lang="en">

<head>
<meta charset="UTF-8">
<meta http-equiv="X-UA-Compatible" content="IE=edge">
<meta name="viewport" content="width=device-width, initial-scale=1.0">
<title>Document</title>
<style>
.box {
position: relative;
float: left;
list-style: none;
width: 200px;
height: 300px;
border: 1px solid red;
margin-left: -1px;
}
/* 父元素没有定位,通过 相对定位 提高层级*/
.box:hover {
position: relative;
border-color: blue;
}
/* 父元素有定位,通过 z-index 提高层级 */
.box:hover {
z-index: 1;
border-color: blue;
}

</style>
</head>

<body>
<ul>
<li class="box">margin-left:-1px 去除边框重合</li>
<li class="box nav1">2</li>
<li class="box">3</li>
</ul>
</body>
</html>

2. 文字环绕浮动元素

想要文字环绕浮动的盒子,只需给盒子增加浮动即可

1
2
3
4
5
6
7
8
9
10
11
12
13
14
15
16
17
18
19
20
21
22
23
24
25
26
27
28
29
30
31
32
33
<!DOCTYPE html>
<html lang="en">

<head>
<meta charset="UTF-8">
<meta http-equiv="X-UA-Compatible" content="IE=edge">
<meta name="viewport" content="width=device-width, initial-scale=1.0">
<title>Document</title>
<style>
* {
padding: 0;
margin: 0;
}
.box {
width: 300px;
height: 70px;
border: 1px solid red;
}
.box img {
width: 120px;
height: 60px;
float: left;
}
</style>
</head>

<body>
<div class="box">
<img src="https://img.pupper.cn/img/202111231118957.png" alt="">
<p>文字环绕浮动元素,文字环绕浮动元素,文字环绕浮动元素</p>
</div>
</body>
</html>

3. 行内块巧妙运用

只要给行内块元素的父元素添加 text-align: center;,所有行内块元素都会水平居中

::: details

1
2
3
4
5
6
7
8
9
10
11
12
13
14
15
16
17
18
19
20
21
22
23
24
25
26
27
28
29
30
31
32
33
34
35
36
37
38
39
40
41
42
43
44
45
46
47
48
49
50
51
52
53
54
55
56
57
58
59
60
61
62
63
64
65
<!DOCTYPE html>
<html lang="en">

<head>
<meta charset="UTF-8">
<meta http-equiv="X-UA-Compatible" content="IE=edge">
<meta name="viewport" content="width=device-width, initial-scale=1.0">
<title>Document</title>
<style>
* {
padding: 0;
margin: 0;
}
.box {
text-align: center;
}
.box a {
display: inline-block;
width: 36px;
height: 36px;
background-color: #f7f7f7;
border: 1px solid #ccc;
text-align: center;
line-height: 36px;
text-decoration: none;
color: #333;
}
.box .prev,
.box .next {
width: 85px;
font-size: 14px;
}
.box .current,
.box .elp {
background-color: #fff;
border: none;
}
.box input,
.box button {
width: 45px;
height: 36px;
border: 1px solid #ccc;
outline: none;
}
</style>
</head>

<body>
<div class="box">
<a href="#" class="prev">&lt;&lt;上一页</a>
<a href="#" class="current">2</a>
<a href="#">3</a>
<a href="#">4</a>
<a href="#">5</a>
<a href="#">...</a>
<a href="#" class="elp">7</a>
<a href="#" class="next">下一页&gt;&gt;</a>
到第
<input type="text">

<button>确定</button>
</div>
</body>

</html>

:::

4. 三角技巧的运用

直角三角形的做法: 把上边框的宽度调大,左边和下边的宽度设置为0 即可

::: details

1
2
3
4
5
6
7
8
9
10
11
12
13
14
15
16
17
18
19
20
21
22
23
24
25
26
27
28
29
30
31
32
33
34
35
36
37
38
39
40
41
42
43
44
45
46
47
48
49
50
51
52
53
54
55
56
57
58
59
60
61
62
63
64
65
66
67
68
69
70
71
72
73
74
75
<!DOCTYPE html>
<html lang="en">

<head>
<meta charset="UTF-8">
<meta http-equiv="X-UA-Compatible" content="IE=edge">
<meta name="viewport" content="width=device-width, initial-scale=1.0">
<title>Document</title>
<style>
* {
padding: 0;
margin: 0;
}
.box {
width: 0;
height: 0;
border-top: 100px solid transparent;
border-right: 50px solid blue;
border-left: 0 solid blue;
border-bottom: 0 solid blue;
/* 简写 */
/* border-color: transparent red transparent transparent;
border-style: solid;
border-width: 100px 50px 0 0; */
}
.price {
width: 160px;
height: 24px;
line-height: 24px;
border: 1px solid red;
margin: 0 auto;
}
.miaosha {
position: relative;
float: left;
width: 90px;
height: 100%;
background-color:red;
text-align: center;
color: #fff;
font-weight: 700;
margin-right: 8px;

}
.miaosha i {
position: absolute;
right: 0;
top: 0;
width: 0;
height: 0;
border-color: transparent #fff transparent transparent;
border-style: solid;
border-width: 24px 10px 0 0;
}
.origin {
font-size: 12px;
color: gray;
text-decoration: line-through;
}

</style>
</head>

<body>
<div class="box"></div>
<div class="price">
<span class="miaosha">
¥1650
<i></i>
</span>
<span class="origin">¥5650</span>
</div>
</body>

</html>

:::

5. css 初始化

京东初始化

1
2
3
4
5
6
7
8
9
10
11
12
13
14
15
16
17
18
19
20
21
22
23
24
25
26
27
28
29
30
31
32
33
34
35
36
37
38
39
40
41
42
43
44
45
46
47
48
49
50
51
52
53
54
55
56
57
58
59
60
61
62
63
64
65
66
67
/* 把我们所有标签的内外边距清零 */
body, h1, h2, h3, h4, h5, h6, hr, p, blockquote, dl, dt, dd, ul, ol, li, pre, form, fieldset, legend, button, input, textarea, th, td {
margin: 0;
padding: 0;
box-sizing: border-box;
}
/* em 和 i 斜体的文字不倾斜 */
em,
i {
font-style: normal
}
/* 去掉li 的小圆点 */
li {
list-style: none
}

img {
/* border 0 照顾低版本浏览器 如果 图片外面包含了链接会有边框的问题 */
border: 0;
/* 取消图片底侧有空白缝隙的问题 */
vertical-align: middle
}

button {
/* 当我们鼠标经过button 按钮的时候,鼠标变成小手 */
cursor: pointer
}

a {
color: #666;
text-decoration: none
}

a:hover {
color: #c81623
}

button,
input {
/* "\5B8B\4F53" 就是宋体的意思 这样浏览器兼容性比较好 */
font-family: Microsoft YaHei, Heiti SC, tahoma, arial, Hiragino Sans GB, "\5B8B\4F53", sans-serif
}

body {
/* CSS3 抗锯齿形 让文字显示的更加清晰 */
-webkit-font-smoothing: antialiased;
background-color: #fff;
font: 12px/1.5 Microsoft YaHei, Heiti SC, tahoma, arial, Hiragino Sans GB, "\5B8B\4F53", sans-serif;
color: #666
}

.hide,
.none {
display: none
}
/* 清除浮动 */
.clearfix:after {
visibility: hidden;
clear: both;
display: block;
content: ".";
height: 0
}

.clearfix {
*zoom: 1
}